


Cornflake Tart Slice is an old school dinner classic that’s packed with nostalgia but more importantly, is absolutely delicious. Using homemade, shop bought or even ready baked shortcrust pasty, the simple base is filled with golden syrup coated cornflakes and an all important layer of strawberry jam. Just add custard!

This post may contain affiliate links. Please refer to my Disclosures Page for more details.
I’ve been meaning to share this recipe for absolutely years. It’s a funny one because people either grew up with it and absolutely love it – or they’ve never even heard of it and think I’m pranking them. Don’t even get me started on the reactions I sometimes get to pink custard, which I’ve often had served with it.
So whether this is something you grew up eating or it’s totally new to you, I can’t recommend making it enough. You can go all-in and make everything from scratch, or skip ahead and buy the pastry. Or even use a ready-baked pastry case to fill. Same goes for the jam – made from scratch or store-bought it’s entirely up to you.
As always, I’ve included full step-by-step instructions with photographs of every stage. So you can make and blind bake the pastry if you fancy. And I’ve shared my best trick to make sure every single bite is absolutely packed with golden syrup coated cornflakes.
I’ve made this version in a rectangular tin and cut it into slices, you can make it in a round tin and serve it in classic pie shaped wedges. Either way, the taste is exactly the same, it is simply preference.

How to Serve Cornflake Tart
I personally love to serve a slice of cornflake tart just a little warm, covered in lashings of hot custard. That’s when it feels like a proper old-school dessert served a meal. But that doesn’t mean I won’t happily eat it cold and on the go at any time.
Although as I’ve mentioned, pink custard is a very common accompaniment from many of our childhoods, at home I do generally just whip up a batch of custard powder custard to have with it.
It’s also lovely served warm with a drizzle of cream or even a scoop of ice cream.

Cornflake Tart Ingredients
Cornflakes
Of course, cornflakes sound like the most important ingredient in a cornflake tart. And while that’s technically true, they’re probably the ingredient I pay the least attention to when shopping.
For any baking like this tart or my chocolate crispy cornflake cakes, I do tend to just buy a cheap own-brand boxes of corn flakes. If I’m eating them as a cereal, it’s Kellogg’s or nothing, but for baking I really don’t think it makes much difference.

Pastry
As I’ve mentioned a couple of times, you could either make the pastry from scratch, buy it ready-made or indeed ready-made and ready rolled. You can also buy an already baked pastry shell.
I choose to use regular shortcrust pastry rather than a sweetened version because it acts as a counterpoint to the very sweet filling. If you do only have a sweet pastry to use up or only able to buy a ready-made sweet pastry case and this will be fine.
unlike puff pastry all American style rough puff which can take a little longer to make, I do generally make my own or butter shortcrust pastry as it really only does take minutes.
All Butter Shortcrust Pastry Recipe
Golden Syrup
Unlike the cornflakes, I do think the golden syrup you use makes a difference to the final tart. Tate & Lyle is the main brand, and it’s the one I prefer to use when baking.
Although there are many own brand versions available, I find that they tend to be a little on the thin side so I’ve started avoiding them. Saying this, if that is all that you have in the cupboard, it will be fine to use. Just maybe consider trying the big brand version next time if it’s in your budget.
Butter
The butter is also very important and you do need to use a proper block butter for this recipe. If you use a spreadable butter or margarine, you won’t find that the tart filling sets up in the way that it should.
I only use salted butter in baking and cooking and life. If, for some reason you insist on buying unsalted butter, you can of course use this. But you will want to add an extra touch of salt to the mixture. The salt balances out some of the sweetness in the recipe and shouldn’t be missed.

Sugar
The soft light brown sugar in the filling mixture might feel excessive because it’s used in addition to the golden syrup which is also a sugar. But the slight caramel notes of the sugar and the texture of it are both important to the filling.
There are some recipes that choose to use a darker brown or muscovado sugar. I actually quite like this adaptation. It makes a recipe overall slightly less sweet and adds in an extra dimension of flavour. But this does turn it into a slightly different tart from the traditional version that we are recreating here.
I would avoid using regular or caster sugar in this recipe as it does just make the filling that bit too sweet without adding the caramel flavour notes.
Jam
It is most traditional to use a strawberry jam in a cornflake tart and this is what I generally stick to. I sometimes use my own homemade smooth strawberry jam. But if I don’t have any shop bought is just fine.
You can switch out other flavour jams if you prefer. The closest to strawberry is going to be raspberry which is just a little more tart. Something like plum jam or fig jam would add an extra grown-up dimension.
I’ve been fairly generous with the jam in this recipe as I find the this layer can be a bit lacking in some cornflake tarts. If you wanted to go even further you could add up to half as much again. Just make sure to spread it very evenly along the pastry.

Be Flexible
You can change the shape or size of the cornflake tart. You can also make it extra deep for a truly indulgence slice. You will only need a little more pastry but much more filling.
You can try making the tart with a different kind of pastry – puff pastry or an American style pie crust would be quite fun and add an extra layer of texture to the tart.
I’ve already mentioned that you can use a different flavour jam but you could also really mix things up and use a sharp orange marmalade or even a fruit curd instead of the jam.
I haven’t really tried making a cornflake tart with different cereals but I can’t see why you couldn’t. You would need to be careful using something with a lot more sugar added like Frosties or honey nut cornflakes. These could become overly sweet and cloying.
But you could go any other direction and make a less sweet, more adult version, using something like bran flakes or even oatibix etc. Rice Krispies and the like would also work but you would need to be cautious on the quantity used as I don’t think you would need the same amount by weight as cornflakes.

Vegetarian or Vegan Cornflake Tart
This cornflake tart recipe is suitable for vegetarians as written.
To make a vegan cornflake tart you would need to start from the very beginning with a dairy free shortcrust pastry. It may be easier to buy a commercially available, ready rolled pastry which do tend to be accidentally vegan here in the UK.
The jam layer shouldn’t pose any problems but you will need to use a plant-based block butter substitute in the filling. Do make sure that this is a block butter variety and not a spreadable margarine so it sets properly.

Make Allergy Friendly Cornflake Tart Slices
This recipe is free from egg and nuts.
Gluten Free: You’ll need to start by sourcing a gluten-free shortcrust pastry or ready-made pastry base. This should be fairly easy here in the UK. You will also want to make sure that your cornflakes are certified gluten-free if this is important. Although cornflakes don’t technically contain gluten, there does seem to be an issue with a lot of cross-contamination of cereals.
Dairy Free: As with making a vegan version you will need to find a dairy-free pastry to use and substitute the butter in the recipe for a plant-based version.
Please note that this recipe may contain other allergens not referred to above and any variations suggested have not been tested unless otherwise stated. For more information regarding any dietary information provided on this website, please refer to my Nutritional Disclaimer.

Equipment Notes for Cornflake Tart
Baking Tin
I’ve used an enamel baking tin which is 20 x 25 cm (8” x 10”). You can use any tin around this size and depth – the 23 x 23 cm (9″ x 9″) square tin that I’ve linked to is about right. You can also use a round 25cm (10″) quiche/tart tin.
The pastry shouldn’t really stick due to the amount of fat in it. But if you’re using something that you know tends to stick, you might want to make sure that you grease it well or use a liner like baking parchment underneath the pastry.

Baking Beads
I do find it very useful to have proper baking beads on hand. You do need more than you think, I used 2 x 500g/1lb tubs of baking beans to line this one tart case. Not using enough beads It is often a reason that people struggle with blind baking pastry. So do bear this in mind. The beads ideally want to fully fill the pastry case, not just one layer on the bottom. This helps to prevent the sides from collapsing of shrinking during the initial bake.
if you don’t have baking beads then you can use another ingredient out of the pantry that will not melt and will fall nicely into the corners of your pastry case. Rice is very common to use as is flour. I do prefer the rice option because you can put it in a jar or bag and reuse it for the same purpose again and again. Flour works fine but it is just a little bit messier to work with.
A comprehensive list of the equipment used to make this recipe is included in the main recipe card below. Click on any item to see an example. There are no hard and fast rules so many items can be sensibly substituted to achieve the same results.

Get Ahead
You can make shortcrust pastry a couple of days in advance. You can make and blind bake the pastry case a couple of days in advance. But I wouldn’t suggest making up the filling until you are intending on filling the tart shell. It will start to set as it cools and become much harder to push into the pastry base.
Once the tart is fully assembled you don’t need to cook it straight away. It can sit, again for a day or two, before being baked. This is especially helpful if you want to serve it hot from the oven but make it in advance.
Once baked, the tart will last for a good week in an airtight container out of the fridge. This makes the cornflake slices a really good option for parties, bake sales, street parties, etc.

Leftover Cornflake Tart
I’m not really sure that I agree with the concept of having leftovers of something like this. You just really have more to eat at a later date!
But I’ll take this opportunity to discuss reheating. I like to just give it around 20 seconds per slice in the microwave. This just warms it slightly without risking boiling the filling and making it tough and chewy. The pastry does go a little soft again – this is how I like it.
For a crispier reheat, you can put slices of the tart back in the oven or even in the air fryer for a few minutes.

Cornflake Tart Tips
Taking a little bit of time and making sure that your pastry case is properly blind baked will make a difference to the overall tart. As much as I personally enjoy a soggy bottom I know most people don’t want this! Try not to skip and of my recipe steps for the best outcome.
Do be careful when transporting the pastry case to and from the oven with the baking beads. They do get very hot and can be quite heavy. So do bear this in mind especially when removing them from the pastry.
Following my instructions to add the filling to the pastry in two layers and really press it down into the sides and corners a tart will really help. This will give you a nice even distribution of cornflakes, no big holes or gaps and a tart that will slice nice and easy.

Don’t forget to let me know in the comments if you try making this recipe – I want to know what you think and if you made any substitutions, how did it turn out?
Still Have Questions?
Simple! Just contact me and I will do my best to help as quickly as I am able. Head over to my Contact Me page, any of my social media channels or post a comment at the bottom of this page and I’ll see what I can do.
Pin Cornflake Tart Slice – British School Recipe For Later
Hit one of the share buttons to save this page to your Pinterest boards so you can come back and find it at anytime!

Keep Up to Date
Make sure you SUBSCRIBE to my newsletter and avoid missing out on any of my newest and bonus content. Don’t worry, I promise not to spam you or bombard you too often. Plus you’ll receive a copy of my FREE 7 Day International Meal Plan!
Also please don’t forget to follow me over on my social media channels over at Facebook, Instagram and Pinterest. I love to interact with my followers and I’d love you to share my content with your friends too.
More Classic British Bake Recipes


The Recipe
Cornflake Tart Slice – British School Recipe

Equipment
- Roasting Tin – Small 20 x 25 cm (8” x 10”) rectangular
- Baking Paper
Ingredients
- 400 g Shortcrust Pastry
- Plain Flour (All Purpose) - for rolling if needed
- 75 g Salted Butter
- ⅛ tsp Sea Salt Flakes
- 75 g Light Brown Sugar
- 200 g Golden Syrup
- 200 g Cornflakes
- 200 g Strawberry Jam
Instructions
Blink Bake the Pastry Case
- Preheat the oven to 190°c fan/375f.
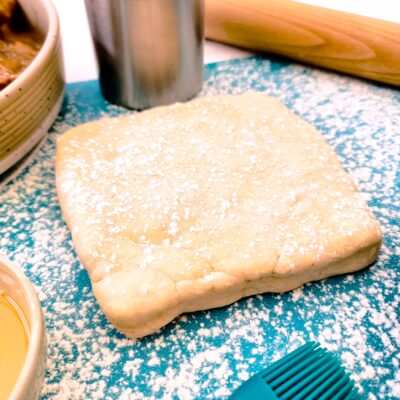
- Place roughly 400g Shortcrust Pastry onto a floured board. As you are going to roll the pastry into a rectangle, it is a good idea to use the palms of your hands to coax the pastry into a more square rather than round shape if it isn't already.


- Roll the pastry out until it is a little larger than the baking tin. Keep releasing the pastry from the surface and turning it/flipping it after each roll. This will make it easier to roll out and keep the thickness nice and even. You need to make sure there is enough pastry to line up the sides of the tin too. Use the tin as a guide to help you.

- Carefully life the pastry into the tin. Ease the pastry into the corners by lifting it rather than stretching it. Use your knuckle to press to make sure the pastry is fully in the corners and there aren't any air pockets underneath it.

- Use a small sharp knife to cut along the outside edge to remove any excess pasty.

- Take this opportunity to again run around the edges with the side of your finger and make sure it is firmly pressed against the tin.

- Cut a piece of baking paper that is a little bigger than the pastry sheet was. Scrunch it up and then open it back out a couple of times. This will make it soft and pliable.

- Line the pastry with the paper. Again make sure the paper goes right into all the edges and corners.

- Tip your baking beans into the tin. Ideally you want there to be enough beans to come right up to the top of the tin but don't worry too much if you don't.

- Bake the pastry for 10 minutes. Remove from the oven and carefully spoon out the baking beans – they will be very hot.

- Remove the baking paper to reveal the part cooked pastry shell. You will see that it is still dark looking on the base.

- Bake the pastry for a further 8 minutes until lightly golden all over. If the pastry puffs up a bit, don't worry, just gently press it back down when it comes out the oven.

- Set aside to cool slightly while you make the filling.
Prepare the Cornflakes
- Add 75g Butter, 75g Light Brown Sugar, and 200g Golden Syrup to a large saucepan along with a small amount of salt – around ⅛ tsp Sea Salt Flakes.

- Heat gently until all the syrup is warm and the butter and sugar are fully melted. You don't need to boil it. Remove from the heat.

- Add 200g Cornflakes to the mixture and stir until they're fully coated. This might take a couple of minutes but keep the faith and make sure to really dig down to the bottom of the pan when you're mixing.


Assemble the Tart
- Spoon around 200g Strawberry Jam into the pastry case.

- Use the back of a spoon to gently spread it evenly all over the base of the pastry. Make sure to go right to the edges.

- Start to slowly spoon the cornflake mix into the pastry. I suggest doing this a little at a time and starting with the edges and corners.

- Once around half the cornflake mix is in the tin, use the spatula to firmly press it down into the pastry.

- Continue to pile the rest of the mixture on.

- Once it is all in, make sure it is nice and even.

Bake
- Bake the tart for 12 minutes at 190c fan / 375f.

- Allow to cool for at least 10 minutes before cutting into 8 even slices. Serve warm or cold.
Karen says
This was a tasty blast from the past. Forgot how much I loved this and so easy to bake too. I had mine warm with. Custard.