


You can’t go wrong using my simple How to Line a Round Pie Dish with Ready Rolled Puff Pastry instructions. I show you how to roll the pastry to the perfect shape, move the pastry and get it into the corners without stretching or tearing, seal and crimp the pie and decorate it too. All accompanied with clear step-by-step images so it’s fool proof!

This post may contain affiliate links. Please refer to my Disclosures Page for more details.
I apologise for the very clunky title of this post but it was important to include all the variables so you know what that you’re in the right place. However the theory is really the same if you are lining a square or rectangle pie (roll to a different shape), using non-ready-rolled pastry (roll it more) or indeed using a pastry that isn’t puff pastry (no changes needed).
So hopefully these simple instructions will help remove any fear and set you up for success. 90% of all cooking and baking is just confidence based. That probably rises to 95% when dealing with pastry. Don’t fear it and it will be fine. And if all else fails, re-roll it and try again. Or use a little bit of spare pastry and patch the hole. It’ll still taste the same and undoubtedly be delicious.

Which Ready Rolled Puff Pastry is Best?
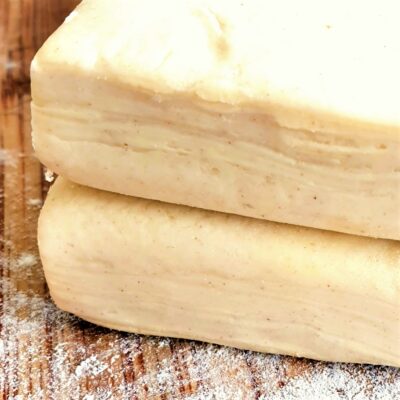
I used to use any supermarket own brand pastry that I fancied or was on offer. But then I started to use Jus-Roll which is the biggest and most common brand here in the UK. It is a little more expensive but again I tend to try and buy it when it’s on offer. Pastry freezes very well. And I will not be going back to using own brand. It is a little bit thicker and so much easier to handle and work with.
So it turns out that in the case of ready rolled pastry, spending a few extra pennies is in fact worth it. Saying that, you will still find yourself with a perfectly delicious and edible pie using any shop bought pastry. Including any that you have to roll yourself.
If you do really want to take your pie to the next level, buy the “all butter puff pastry” option. And if you really want to blow your socks off, have a go at making your own. It isn’t difficult and it is probably less time consuming that you think.
Puff Pastry Recipe
Other Pie Pastry
You can still use these step-by-step instructions if you are using a pastry that is not puff. The main exception here is filo/phyllo/bric pastry which does need to be treated differently.
But otherwise the basic concept is exactly the same. For the most part, other non laminated pastries are actually even easier to work with because you don’t need think about keep the layers perfect as you roll.
Use store-bought or try one of my other homemade pastry recipes:
All Butter Shortcrust Pastry Recipe

American Pie Pastry Recipe (Buttery Rough Puff)

Traditional Suet Pastry Recipe
Allergy Friendly Puff Pastry Pie Crust
If you are using store brought pastry then it is of course important to read the ingredients of the specific pastry you’re buying. If making from scratch then you will of course be making sure that is is suitable for your dietary requirements. And whilst outside the scope of this post, you will also need to consider the ingredients of whichever filling you are planning to use.
Gluten Free: Ready-rolled gluten free pastry is now fairly readily available here in the UK – usually found next to the gluten filled option in the chillers. In smaller stores you may have to resort to checking the freezers. You may only find block rather than ready-rolled but that is easily surmountable.
Dairy Free: Most standard ready-rolled puff pastry in the UK is actually both dairy and egg free and therefore suitable for vegans as well as those with allergens. Any pastry which mentions butter in the title will however contain at least some dairy butter so this should be avoided. If making from scratch, you can use a dairy-free block butter alternative instead of the dairy butter.
Egg Free: Again, most commercial pastries will not contain any egg but do double check. Instead of using beaten egg to help seal the pastry edges, glaze the top and glue on any decorations, you can use cream or milk instead. This can be plant-based if needed. Otherwise it is best to use water to seal the pastry and add decorations and leave the lid unglazed.
Please note that this recipe may contain other allergens not referred to above and any variations suggested have not been tested unless otherwise stated. For more information regarding any dietary information provided on this website, please refer to my Nutritional Disclaimer.

What Pie Tin or Dish is Best?
TLDR; Enamel or non-stick metal tins are best, pie dishes with holes in them are even better. Ceramic is fine, pyrex/tempered glass is fine.
I am a little happy go lucky with the kind of pie dish I use. I will use tempered glass, ceramic, enamelled tins or heavy duty non-stick tins. I own a whole selection of dishes and which I choose does tend to be slightly vibes base.
However I’ve done some soul searching and there are actually some reasons why I choose the one I do. One is size but we’ll ignore that for now – these instructions assume you are using a 23cm/9″ diameter tin with not overly sloped sides and around 5cm/2″ deep.
If you are at all unconfident, a metal tin will always be your best bet. The heat of the oven is conducted quickly and effectively by the metal which will help your pastry to bake quickly and crisp nicely. This is especially important when you are not blind baking the pastry first.
Enamel dishes are a firm favourite of mine – they are very hardwearing and you don’t need to be as careful as with a classic non-stick coating. Still nothing much wrong with non-stick tins, they do the same job, you just need to be more careful not to use metal utensils etc on them.

One of my absolute favourite options is the perforated non-stick pie dish that I used to demonstrate how to blind bake my American style pie pastry. It removes almost any opportunity for the pastry to stay soggy.
A comprehensive list of the equipment used to make this recipe is included in the main recipe card below. Click on any item to see an example. There are no hard and fast rules so many items can be sensibly substituted to achieve the same results.
Step-By-Step Instructions
Line the Pie Dish
Ready rolled pastry is usually sold in rolled up rectangles in the UK. Pastry may be bought in circles or squares in other countries in which case you can ignore this step.
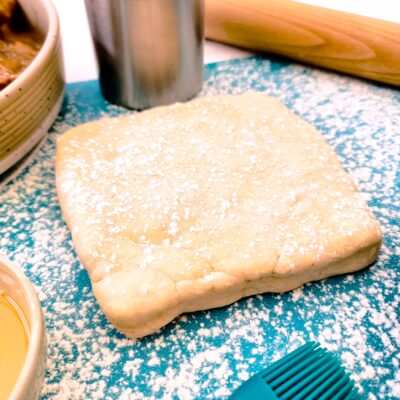
To make the rectangle of pastry into a square, start by unrolling up and then folding it neatly in half.


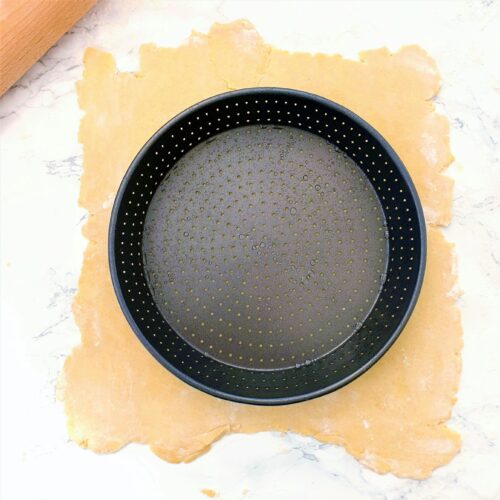
Use a rolling pin to roll the pastry until it is larger than your pie dish. You need to make sure that it’s big enough to cover the bottom and up the sides of the dish.
If you are using a block of pastry, you will need to do the same thing.
Make sure to lift the pastry sheet and turn or flip it over after each roll. Releasing the pastry from the counter top will allow it to roll more smoothly and evenly. Use a light dusting of flour on the counter and rolling pin if the pastry feels at all sticky.


To easily move the pastry into the pie dish, gently fold it into half and then half again.
Move the pastry into the pie dish with the middle point in the centre of the dish.
Gently unfold the pastry and carefully press it into the bottom/corners. Try to lift the pastry and ease it in rather than stretching the pastry.


If you find you have any splits, tears or holes in the pastry, pull off little pieces of the overhanging pastry and patch them up.
If your kitchen is warm or you have taken a while getting to this point, you should consider putting the dish and pastry back into the fridge to chill for a little while.
Fill the Pie
No matter what filling you are using in your pie, you need to make sure that it is not at all warm.
Carefully spoon the filling into the pastry. I like to start around the outside and make sure that each spoonful gets right into the edges. Fill in the middle section and press the filling with the back of the spoon until the filling is sitting nice and evenly.


Make the Pastry Lid
Repeat the pastry rolling process with the second piece of pastry. This time you need to make sure that the pastry is just a little larger that the top of the pie.


Use an egg wash, milk or water to brush around the rim of the pie. This will help the pastry lid to stick to the pie pastry case.
You can either use the fold-into-quarters, move and then unfold method like before or gently roll the pastry around the rolling pin. Unroll or unfold the pastry over the top of the pie.


Press along all the rim of the pie so the two pieces of pastry mesh together.
Use a sharp knife to trim around the edge of the pastry. Keep the scraps aside to use for any decorations you might want to make.


Go back around the edge of the pastry and pinch it together.
I like to crimp the edge of my pie by using 2 fingers on one hand and the thumb on my other hand to press the pastry in-between them. This seals the pastry extra well.
If you don’t want to add a crimp, use a fork to press down around the edge of the pastry instead..


Wash the top of the pastry and all of the crimps with egg or milk depending on your recipe. Egg will give you the glossiest golden finish.


Decorate the Pie
Cut out any shapes from the scrap pieces of pastry that you wish. I used the crimped edge of round cookie cutters to make these pretty leaf like shapes. But you can use any shapes or designs you please.


Brush more egg/milk wash over the top of the decorations and you’re ready to chill or bake the pie!

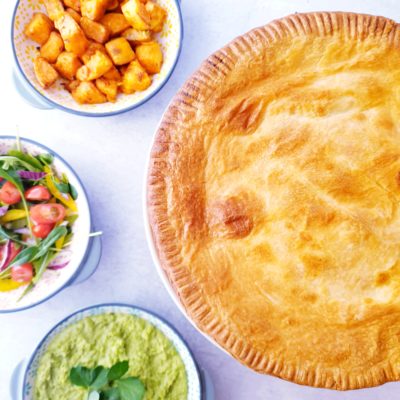
Pie Filling Recipes
Most of my pie recipes do generally come with at least rudimentary instructions regarding the pastry to be used and how to line the dish but if you’re looking for inspiration, do have a look at them:

Beef & Ale Pie with Puff Pastry Recipe
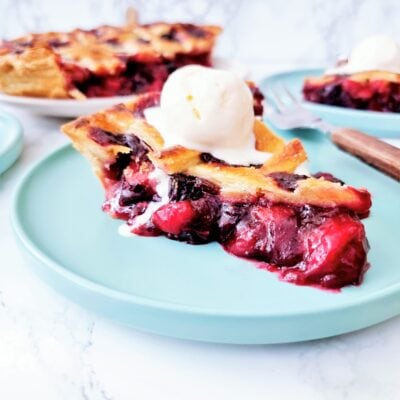
American Strawberry Blueberry Pie Recipe
Puff Pastry Bacon & Egg Pie Recipe
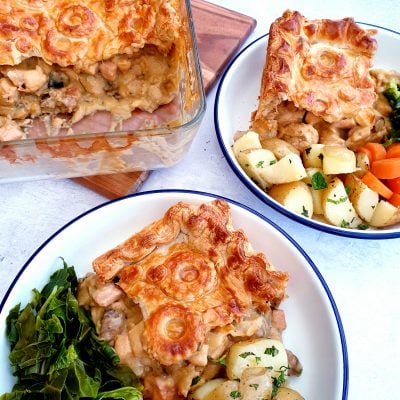
Puff Pastry Pie with Chicken, Ham & Mushroom Recipe
Don’t forget to let me know in the comments if you try making this recipe – I want to know what you think and if you made any substitutions, how did it turn out?
Still Have Questions?
Simple! Just contact me and I will do my best to help as quickly as I am able. Head over to my Contact Me page, any of my social media channels or post a comment at the bottom of this page and I’ll see what I can do.
Pin How to Line a Round Pie Dish with Ready Rolled Puff Pastry (UK) For Later
Hit one of the share buttons to save this page to your Pinterest boards so you can come back and find it at anytime!

Keep Up to Date
Make sure you SUBSCRIBE to my newsletter and avoid missing out on any of my newest and bonus content. Don’t worry, I promise not to spam you or bombard you too often. Plus you’ll receive a copy of my FREE 7 Day International Meal Plan!
Also please don’t forget to follow me over on my social media channels over at Facebook, Instagram and Pinterest. I love to interact with my followers and I’d love you to share my content with your friends too.
More Pastry Recipes


The Recipe
How to Line a Round Pie Dish with Ready Rolled Puff Pastry (UK)

Equipment
Ingredients
- 640 g Puff Pastry - ready rolled sheet
Instructions
Line the Pie Dish
- Ready rolled pastry is usually sold in rolled up rectangles in the UK. Pastry may be bought in circles or squares in other countries in which case you can ignore this step. To make the rectangle of pastry into a square, start by unrolling up and then folding it neatly in half.
- Use a rolling pin to roll the pastry until it is larger than your pie dish. You need to make sure that it's big enough to cover the bottom and up the sides of the dish. If you are using a block of pastry, you will need to do the same thing.
- Make sure to lift the pastry sheet and turn or flip it over after each roll. Releasing the pastry from the counter top will allow it to roll more smoothly and evenly. Use a light dusting of flour on the counter and rolling pin if the pastry feels at all sticky.
- To easily move the pastry into the pie dish, gently fold it into half and then half again.
- Move the pastry into the pie dish with the middle point in the centre of the dish.
- Gently unfold the pastry and carefully press it into the bottom/corners. Try to lift the pastry and ease it in rather than stretching the pastry.
- If you find you have any splits, tears or holes in the pastry, pull off little pieces of the overhanging pastry and patch them up.
- If your kitchen is warm or you have taken a while getting to this point, you should consider putting the dish and pastry back into the fridge to chill for a little while.
Fill the Pie
- Note – No matter what filling you are using in your pie, you need to make sure that it is not at all warm.
- Carefully spoon the filling into the pastry. I like to start around the outside and make sure that each spoonful gets right into the edges. Fill in the middle section and press the filling with the back of the spoon until the filling is sitting nice and evenly.
Make the Pastry Lid
- Repeat the pastry rolling process with the second piece of pastry. This time you need to make sure that the pastry is just a little larger that the top of the pie.
- Use an egg wash, milk or water to brush around the rim of the pie. This will help the pastry lid to stick to the pie pastry case.
- You can either use the fold-into-quarters, move and then unfold method like before or gently roll the pastry around the rolling pin. Unroll or unfold the pastry over the top of the pie.
- Press along all the rim of the pie so the two pieces of pastry mesh together.
- Use a sharp knife to trim around the edge of the pastry. Keep the scraps aside to use for any decorations you might want to make.
- Go back around the edge of the pastry and pinch it together.
- I like to crimp the edge of my pie by using 2 fingers on one hand and the thumb on my other hand to press the pastry in-between them. This seals the pastry extra well.
- If you don't want to add a crimp, use a fork to press down around the edge of the pastry instead..
- Wash the top of the pastry and all of the crimps with egg or milk depending on your recipe. Egg will give you the glossiest golden finish.
Decorate the Pie
- Cut out any shapes from the scrap pieces of pastry that you wish. I used the crimped edge of round cookie cutters to make these pretty leaf like shapes. But you can use any shapes or designs you please.
- Brush more egg/milk wash over the top of the decorations and you're ready to chill or bake the pie!
Mary says
Your information is a helpful ‘how to’ for cooks starting out and even people like me who have been cooking for longer than I care to remember.
A big thank you for the time you put in to set out such easy to follow instructions and all for free!! A fantastic site!
Chloe says
Aw that’s so kind of you to take the time to let me know thank you. Making recipes and cooking accessible to everyone at all levels has been my aim from day one and it is always so heartening to hear that I’m hitting that brief 🙂
Karen says
A very helpful post. I followed your simple instructions and for once managed to line my pie tin without a single tear, no need for my usual patch up job.