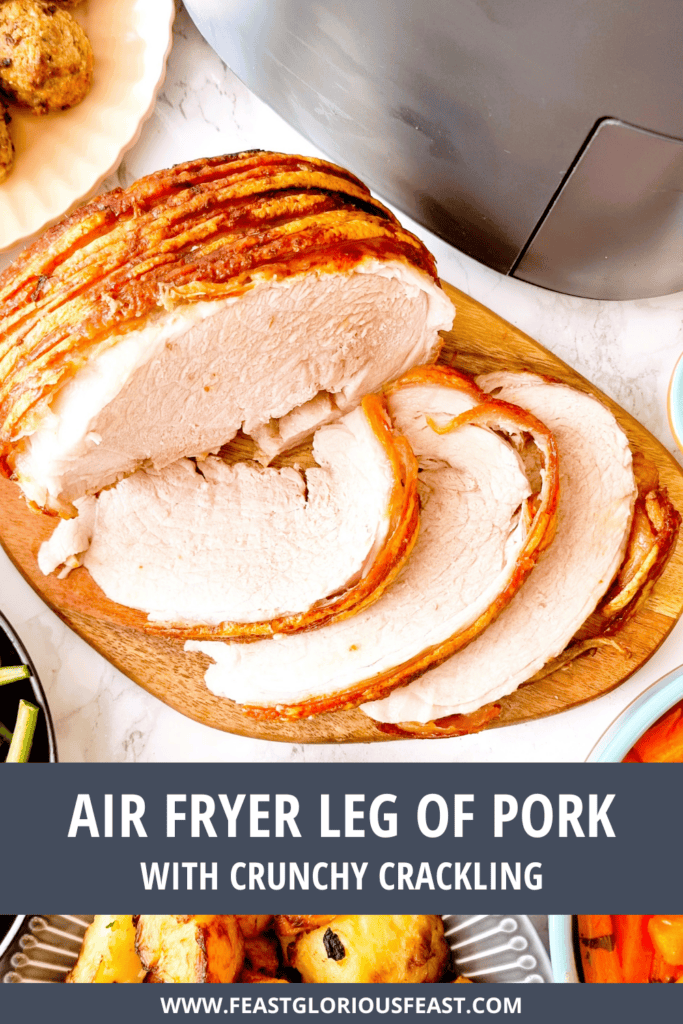


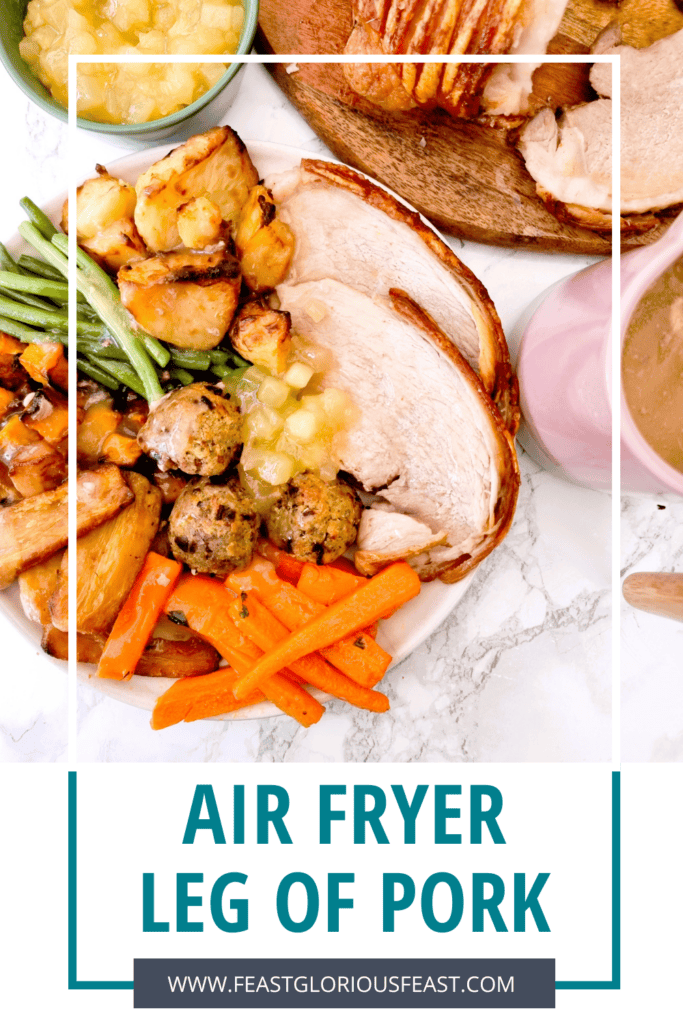
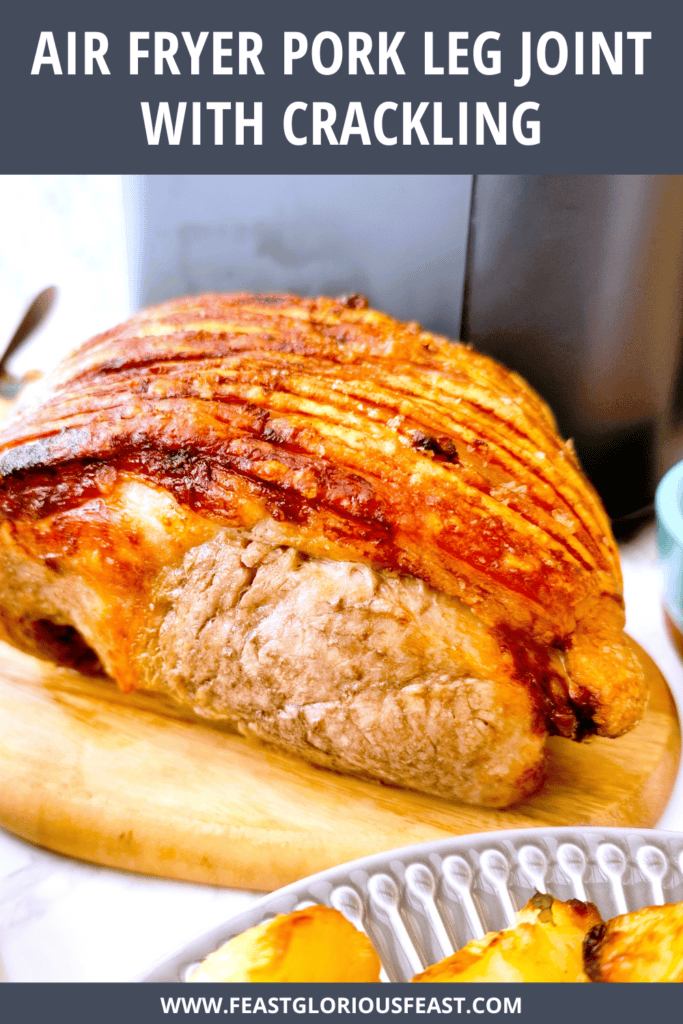
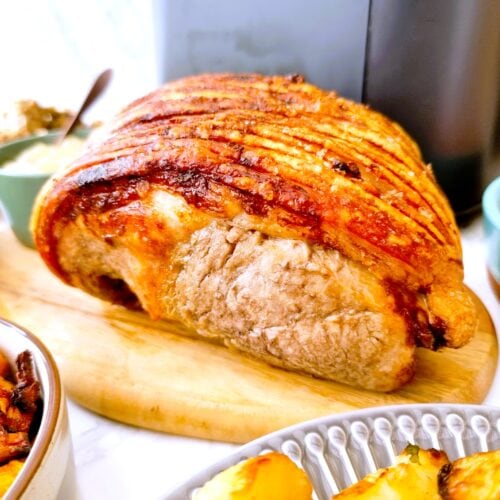
This Air Fryer Pork Leg Joint with Crackling and gravy made from the meat juices is simple, easy and delicious. You can’t make better pork crackling than you can in an air fryer, that all round heat is just magic!
This post may contain affiliate links. Please refer to my Disclosures Page for more details.
You’ll find that many air fryer recipes on the internet are just called something like “Air Fryer Roast Pork” and don’t specify what cut of pork they’re actually talking about. But after extensive testing, I really do believe that you need to make sure you’re using instructions for how to air fry the particular cut you have. The cooking times really vary to make sure that you get the perfect cook on that particular joint.
Leg joints are much more lean than pork shoulder joints which have much more marbling/fat running through the meat. Pork loin joints are different again with a large eye of leaner meat but a thinner fattier end and a really good layer of fat on top. I find that leg is best fast roasted. This ensures that the meat stays lovely and juicy but you still get a perfect layer of crackling on top.
How to Serve
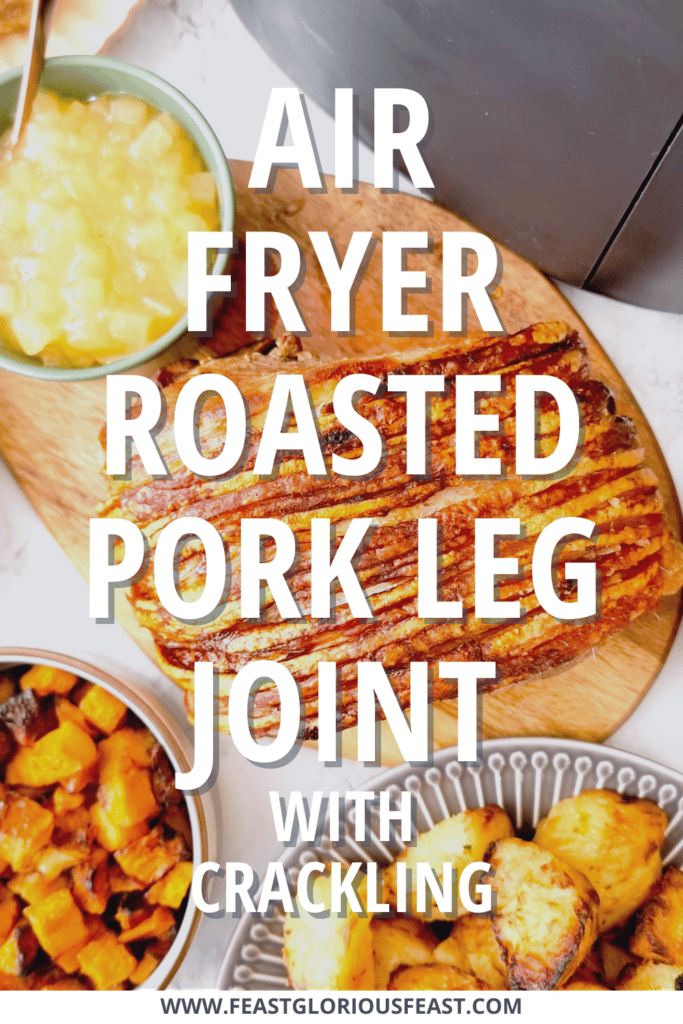
Naturally we’re going to talk about a roast dinner first! 80% of the time that’s the primary reason that I’m cooking a whole joint of pork. You can find all of my roast dinner recipes here – it’s getting to be a pretty comprehensive collection!

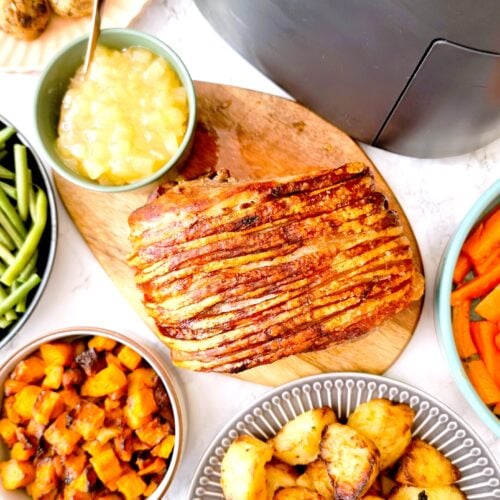
If you want to replicate the dinner in the photos on this page, add the following to the pork and gravy:

The other 20% of the time, I do something a little different with my roast pork leg. I especially love to make Mexican inspired meals – you might think about pulled/slow cooked pork being more traditional but I love making wraps, tacos and rice bowls with more hearty slices of pork. The same goes for Asian and Mediterranean style meals. Try some of these meal ideas:
- Serve with grilled tortilla wraps stuffed with guacamole, shredded iceberg lettuce, a fresh salsa topped off with sour cream and some hot sauce.
- Make a rice bowl with sticky rice and top with sesame tender stem broccoli and hot honey butter garlic sauce. Add some sliced avocado or shredded white cabbage for more texture.
- Air fry whole baby potatoes and serve with a salad of rocket or spinach leaves, confit tomatoes, pearl mozzarella balls and buttery lemon & garlic green beans.
Don’t forget this classic sauce!

Homemade British Apple Sauce Recipe (For Pork)
Ingredients
Leg of Pork
This cut is largely self explanatory where it comes from! It is important to note that this recipe is talking about boneless joints. The cooking times and maybe temperatures would be different for a bone-in cut.
But to be honest, it’s very rare that I see bone-in legs available to buy here in the UK. I’m sure that a good proper butcher would have them however so it is worth specifying.
The two important things to look for when selecting the joint is that there is a good layer of fat/skin covering the whole of the top of the piece. And the second is that I try to pick one that is an even thickness all the way across. Both of these things are going to help you get a nice even cook on your pork. And of course the good layer of skin results in more crackling.
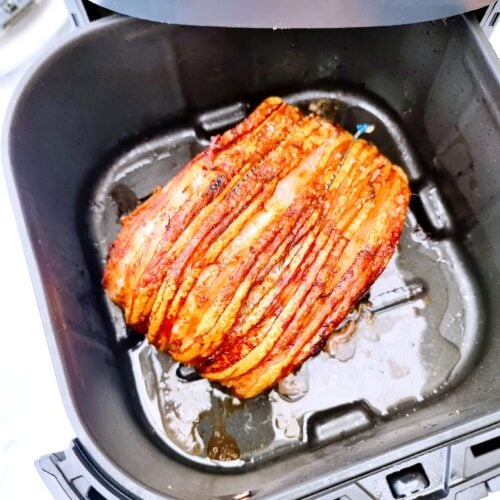
You must also take into account the size of the piece in relation to the size of your air fryer. The 1.5kg/3.5lb piece that I air fried for this recipe post fit into my 4.7l basket air fryer nicely.
I could go up to 2kg/4.5lb but would need to undo the string and uncurl the meat like I had to do with my pork shoulder joint. Don’t be fooled like I was – remember that the pork puffs upwards as it cooks and this is the biggest size issue – you don’t want the skin touching the cooking element.

Oil
Adding extra oil to a cut of meat with a healthy layer of fat might seem a bit odd but I promise there is a reason. It takes a little while for the fats in the meat to start to render and in the meantime, the outer edges can start to dry out.
A light layer of oil keeps the flesh moist, helps it to start browning and also gives the seasoning a surface to stick to. The same is true for the crackling layer, a little oil helps to kickstart the crackling process.
What oil you choose to use is as always up to you. I generally stick with a neutral vegetable oil. If you want to use a different oil like olive oil, take into account if the flavour will work with whatever you’re planning to serve it with.
Seasoning
It is important to season the meat and skin well. With the skin, the most important thing is salt which will help with the crisping process as well as flavour. I do just use sea salt flakes in this recipe – my preferred option is Maldon Sea Salt.
If you want to add additional herbs, spices and flavourings, feel free to do so. You can use any spice mixes you love, fresh or dried herbs or citrus zest. Think about how the flavours will interact with the oils that you use and what you intend to serve it with. Focus on adding the additional seasonings to the flesh rather than the skin and still don’t skimp on the salt.

Allergen Information
This recipe is free from egg, dairy, gluten and nuts.
Please note that this recipe may contain other allergens not referred to above and any variations suggested have not been tested unless otherwise stated. For more information regarding any dietary information provided on this website, please refer to my Nutritional Disclaimer.
How Long to Air Fry Pork Leg Joint
This 1.5kg/3.5lb boneless pork leg cooks in a pre-heated air fryer in just over an hour. I recommend cooking it in 3 stages. First with the skin side up, then the skin side down and then the final blast with the skin side back up again.
This is the perfect combination to ensure that the pork is cooked through perfectly and that the crackling is crisped to perfection. One of the reasons is that each turn of the meat is an opportunity to drain the fats and juices that are released during cooking process. We want the meat to roast, not steam so removing this is helpful. And it means you can get the gravy started when you’re ready.
How to Air Fry Pork Leg Joint From Frozen
I highly recommend not doing this. Whilst it is often fine to cook smaller cuts from frozen, a large piece of meat like this will not cook thoroughly in the middle, and certainly not before the outer parts aren’t dried to a crisp anyway.
Leftovers – Storage & Reheating
Leftovers from a roasted leg of pork can be a joy. They’ll keep in the fridge for a couple of days but can also be frozen too. If freezing, I’d suggest slicing it first and freezing in smaller portions. I have a home size deli meat slicer and using this gives me really thin slices which is really useful.
I like to reheat sliced meat in the microwave with a drop of water. This ensures that the meat stays really moist as it reheats. You can simulate a similar environment using the air fryer by loosely wrapping the slices in foil. Add that same drop of water and air fry at a high temperature until hot all the way through.
To reheat any crackling, I do this directly in the air fryer, it only takes a couple of minutes.

Common Air Fryer Questions – A Brief Guide to Air Frying
- What exactly is an air fryer?
- What are the benefits of using an air fryer?
- Are all air fryers the same?
- Is an air fryer always better to use than an oven?
- Do air fryers need to be pre-heated?
- What is the best temperature to air fry at?
- What setting is best to use? Air fry, bake, dehydrate, etc…
- Can food be cooked from frozen in an air fryer?
- Can I reheat food in an air fryer?
- Are air fryer liners a good idea?
The Air Fried Feast Community

Come on over to Facebook and join my community discussing all things air fryer. Get involved in sharing your experiences and trials, help out others and find out what wonderful things everyone is cooking in their air fryers!
What Exactly is an Air Fryer?
Very simply, an air fryer is a small convection (fan) oven. The benefit is that the hot air is circulated all around the food being cooked which speeds up the cooking time and cooks the food more evenly.
What are the Benefits of Using an Air Fryer?
Size, time and energy usage. Air fryers are ideal for cooking smaller quantities. Heating up a space that the food just fits into requires less energy and means that the heat source is much closer to the food. Combining these two things can speed up the cooking time.

Are all air fryers the same?
Nope! The term air fryer is now used very broadly. I consider there to be 4 main types:
Basket Air Fryers
These are what I would consider to be the most common, especially in the UK. A boxy type unit has a pull out drawer/basket. Food isn’t usually visible whilst cooking.
Some larger models have two drawers so different items can be cooked at different temperatures or for different times.
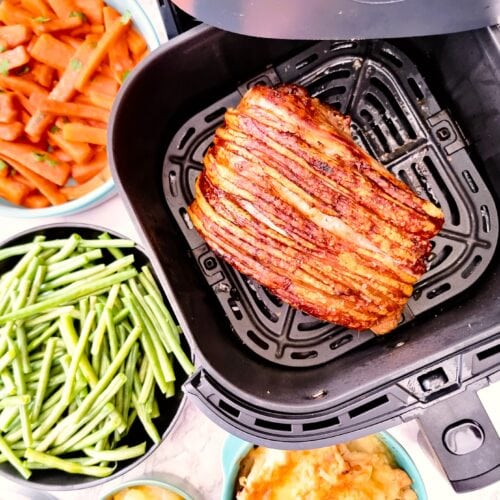
This is the type that you’ll see in the images in this recipe. I mostly use a Cosori Lite 3.8L (CAF-LI401S) with a 3.8 litre capacity. The square(ish) shaped basket is 21cm x 21cm and 24cm on the diagonal. It isn’t an overly expensive or fancy model.
I’ve also recommended to several friends and family the model with a slightly larger basket. This is the Cosori 4.7L (CAF-L501) with a 4.7 litre basket. The unit is no larger than the 3.8 litre model on the outside but does have a larger internal basket capacity. I’ve since bought this version to use for some recipes where my smaller model was just too small. I’ll always note this in the recipe.
Rotary Air Fryers
Round air fryers with a paddle in the centre that rotates to move the food. This is the type I used for years – the most common is a Tefal Actifry.
Rotary types are not usually good for recipes where the food is breaded, glazed, likely to break up or in a tray/container. They do however make the best chips and roasted veg.
My 2 in 1 version like the one I’ve linked also has a rotating tray for things that could be broken up by a paddle, but the height clearance with the lid isn’t deep enough to use it to cook some items like sausage rolls. I’ve now actually retired by Actifry in favour of having my two basket type fryers.
Mini Oven Air Fryers
These usually have a glass door, shelves and overall are really quite large. You can cook quite a decent quantity of food in them so are best if regularly cooking for multiple people. They often come with extra features like a rotisserie spit or kebab skewers.
Multicookers with Air Fryer Functions
Some like Ninja 11 in 1 and some of the earlier versions with a few less functions, have an air fryer option. They mostly operate the same as a basket fryer but the basket drops in the top rather than sliding in like a drawer.
Some electric pressure cookers like Instant Pots can also air fry when used with a specific lid.

Is an air fryer always better to use than an oven?
As much as I do love air frying, the honest answer to this is no. And the more detailed answer is that it will always depend on what you’re cooking, how much of it you’re cooking and what type and size of air fryer you have.
Once you need to cook in more than 2 batches, it often makes more sense to use an oven. If you already have the oven on to cook other items, it may make more sense to throw one more item in rather than using an additional appliance.
I don’t think either method is often necessarily better than the other. The important point to note is that there is absolutely no difference in the finished product.
Do Air Fryers Need to Be Pre-Heated?
The answer to this is rather annoying – it depends. It depends entirely on your model and type of air fryer. The best advice I can offer is to check your manual and follow their guidance. My Cosori models have a preheat function. I press a button and it heats at 205c/400f for 4 minutes.
It’s also worth noting that regardless of whether you are supposed to pre-heat or not, if you are cooking in batches, it is quite likely that anything after the first batch will cook a little quicker because of the retained heat. It is best to check on them before the cooking time is completed.

What is the best temperature to Air Fry at?
It will always depend on what you are cooking and from what state. All of my air fryer recipes don’t use temperatures above 200c/390f because many of the most common fryers in the UK don’t go above this. Mine goes to 230c/450f and I use this temperature a lot but it is no help for me to share recipes which many people can’t use.
What setting is best to use? Air fry, bake, dehydrate, etc…
Not all air fryers have different settings like this. When they do it usually relates to the fan speed. The default setting to use will always be “air fry” so unless something else is specifically stated in the recipe, always use the air fry option.
There are other air fryers that have an additional heating element which cooks from underneath rather than just the top. Just as with the other settings, unless you are using a recipe which states to use a second heating element, stick with just using the top down air fry option.
Of course if and when you become more confident with air frying, using recipes and the settings of your air fryer, you can start adapting them to suit.

Can Food Be Cooked From Frozen In An Air Fryer?
Absolutely! To cook from frozen you usually will need to reduce the cooking temperature and increase the time to make sure your food is cooked right through to the middle.
It is best to check my individual recipes for cooking from frozen advice as some items are a little different. And there are occasionally exceptions to the rule.
Can I Reheat Food In An Air Fryer?
Yes. As a general rule I reheat food for roughly 1/3 of the original cooking time at the same temperature. Or at 10 degrees lower for half the time for larger items.

Are Air Fryer Liners a Good Idea?
Unless otherwise stated, I do not use liners when air frying. Basket and rotary type air fryers are designed to be used without liners. Mini oven types will generally require some kind of tray like with a regular large oven although most come with crisper racks to use.
There are many air fryer liners available including quite thick silicone ones. These will affect the cooking times and possibly temperatures of your cooking/baking. I also don’t like how cooking juices are prevented from dripping through the basket rack. This can stop food from crisping all the way around.
When I do want to collect the juices, I mostly use some foil, or occasionally a foil tray which can be washed and reused.
If you do prefer to use them, once you have got a feel for how they affect your cooking and baking, you may need to make adjustments to the recipe accordingly.

More Air Fryer Recipes
All my recipes with instructions for how to cook or bake them in the air fryer can be found in my Air Fryer Recipe Index.


Don’t forget to let me know in the comments if you try making this recipe – I want to know what you think and if you made any substitutions, how did it turn out?
Still Have Questions?
Simple! Just contact me and I will do my best to help as quickly as I am able. Head over to my Contact Me page, any of my social media channels or post a comment at the bottom of this page and I’ll see what I can do.
Pin Air Fryer Pork Leg Joint with Crackling For Later
Hit one of the share buttons to save this page to your Pinterest boards so you can come back and find it at anytime!

Keep Up to Date
Make sure you SUBSCRIBE to my newsletter and avoid missing out on any of my newest and bonus content. Don’t worry, I promise not to spam you or bombard you too often. Plus you’ll receive a copy of my FREE 7 Day International Meal Plan!
Also please don’t forget to follow me over on my social media channels over at Facebook, Instagram and Pinterest. I love to interact with my followers and I’d love you to share my content with your friends too.
The Recipe
Air Fryer Pork Leg Joint with Crackling Recipe

Equipment
Ingredients
- 1.5 kg Pork Leg Joint - with skin for crackling
- 2 tbsp Vegetable Oil
- 1 tbsp Sea Salt Flakes
For the gravy
- 500 ml Water
- 4 tbsp Cornflour (Cornstarch)
- 4 tbsp Water
- Sea Salt Flakes
Instructions
Things to Consider
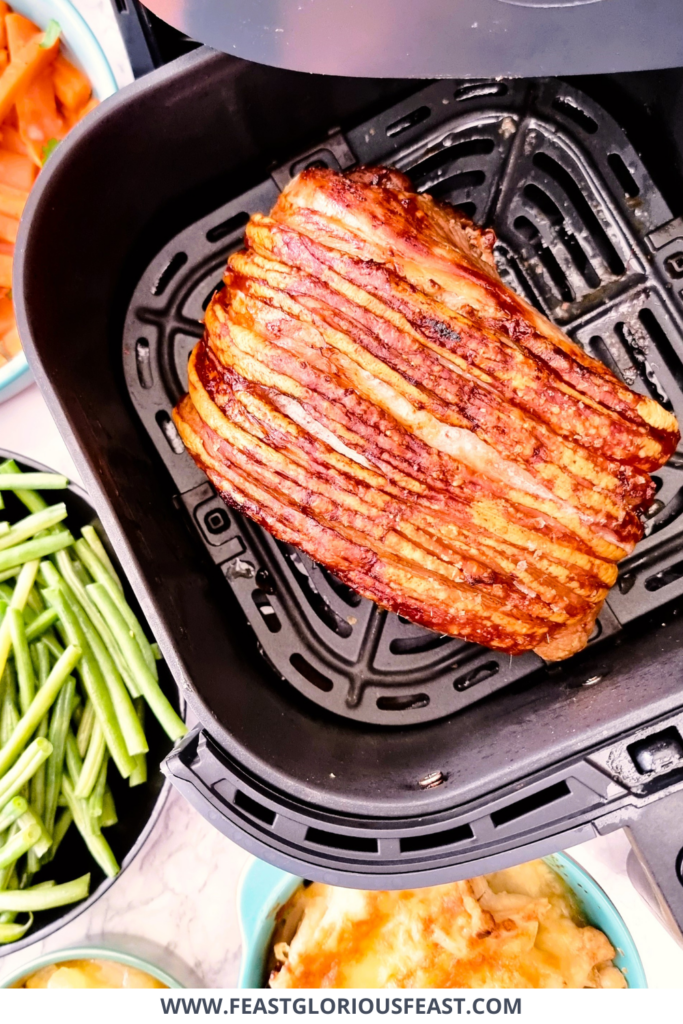
- Make sure that the joint has plenty of clearance in the air fryer with the drawer shut/lid on/door closed. The joints have a tendency of expanding as they start to cook so bear this in mind.If you think there might be an issue, remove any string from the joint and unroll it as much as possible. You can also consider removing the crisper rack – you can see that I did this mid-way through cooking.
- I suggest cooking this joint crackling side up, then down, then up again. This is for good reason. If you start with the skin down, I find it then never crackles at all so it needs the initial shock and crisp with the skin facing the heating element. But if you only cook it right side up, the joint doesn't cook through properly. The final blast with the skin up is essential for it to be fully crisp and crackled when serving. It is good to drain the juices/fat several times during the cooking process so I'd be stopping at each of these points to do that during the cooking process anyway.
Air Fry The Pork Leg
- If your air fryer requires pre-heating, start this setting now.
- Thoroughly dry a 1.5kg Pork Loin Joint.


- Use your sharpest knife to score lines in the fat. Make sure to go all the way to the edges. If the pork fat is already scored, chances are it will benefit from better scoring.
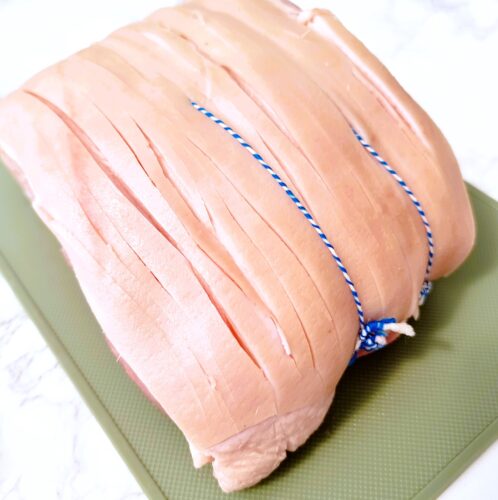

- Drizzle with roughly 2 tbsp Vegetable Oil and rub all over the joint including the underneath and ends.
- Season well with roughly 1 tbsp Sea Salt Flakes. Again, don't miss all the sides and underneath.

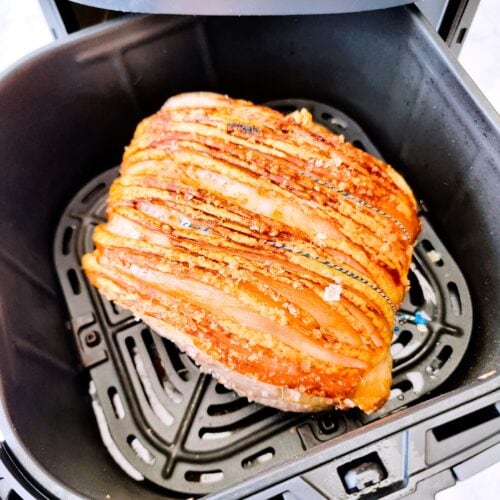
- Place the pork into the air fryer basket with the skin up. If it is a preheated basket, use 2 forks to lower the pork in so you don't touch the hot metal with your hands.
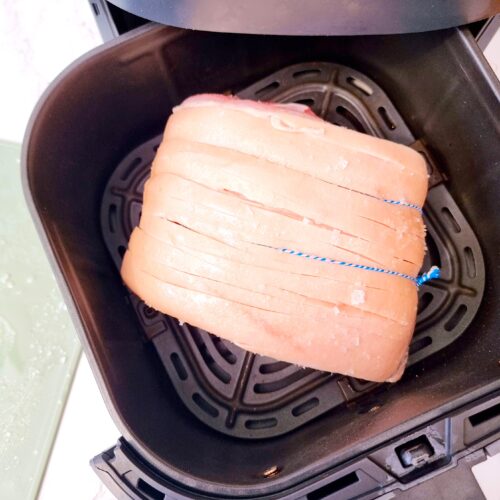
- Air fry for 30 minutes at 180℃/350℉.
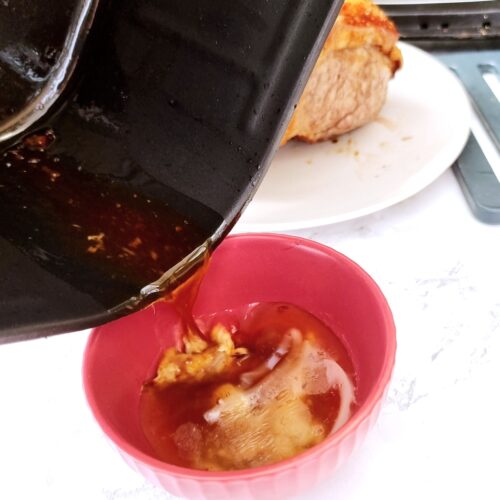
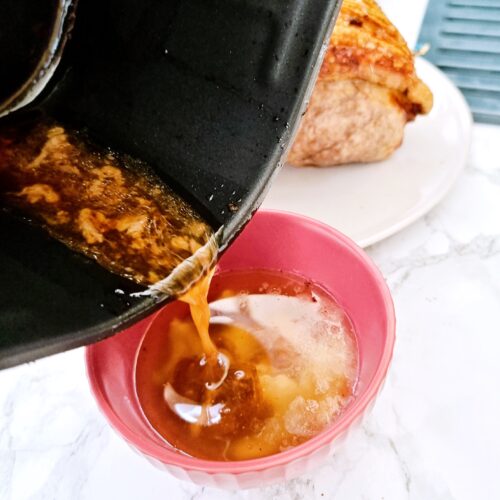
- Secure the pork with a fork and carefully pour out any juices into a heatproof bowl. Remove the joint entirely to do this if you prefer.

- Turn the pork so it's skin side down in the basket.
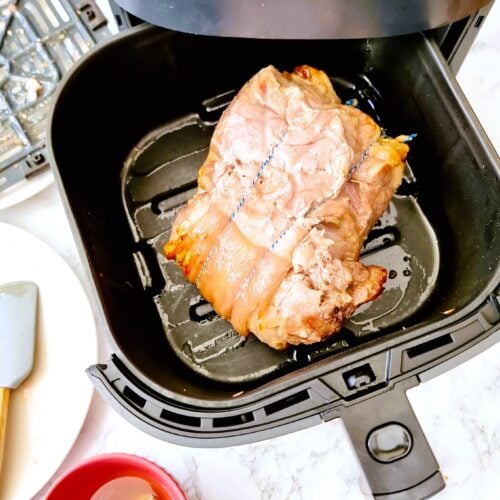
- Air fry for a further 20 minutes at 180℃/350℉.

- Repeat the process of removing the pork and draining all the fat/juices released into bowl with the previous lot.
- Turn the pork once again so it is skin side up and air fry for a further 15 minutes at 180℃/350℉.
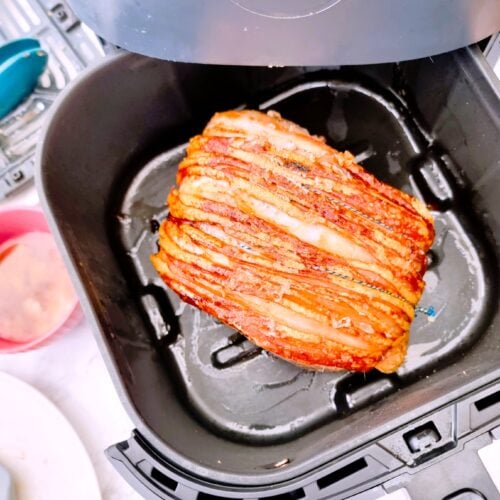
- Check the pork is cooked through, you can see this by making a cut and checking that the meat is nearly white in the centre of the thickest part. I do this on the underneath.
- If you need to cook for longer, do so at the higher temperature. If the crackling is already fully crackled, turn the pork upside down to do this.
- Pour out the remaining juices and fat from the basket.
- Allow the pork to rest for at least 15 minutes. You can either leave the pork in the air fryer turned off or wrap it in foil and cover with a towel. Use this time to make the gravy.

- Don't forget to add any juices from the resting period to the reserved juices/fat or gravy if its already made.
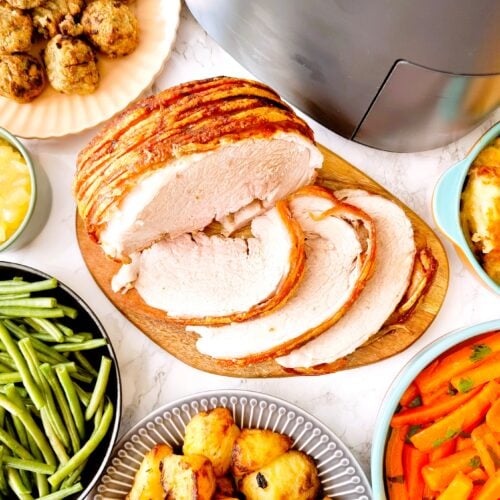
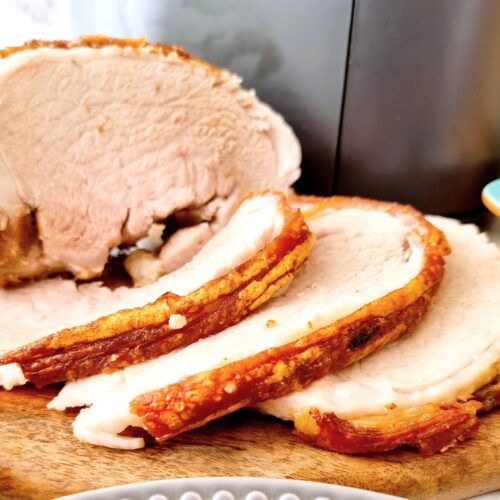
- Carve into thick or thin slices as preferred and serve. You may find it easier to remove the crackling in one piece and slice this separately. Otherwise carving upside down is the easiest way to get through the crackling without squashing the pork.
To Make The Pork Gravy
- Tip all of the drained pork fat and juices into small saucepan and start heating over a high heat.

- Add 400ml Water to the pan. Freshly boiled from the kettle will speed up the process.

- Mix 4 tbsp Cornflour with roughly 4 tbsp Water until all the cornflour has dissolved.

- Once the juices and water have come to the boil, add the cornflour slurry with one hand while whisking with the other.

- Continue to boil until the gravy is thickened. If after a few minutes, it is not thick enough for your liking, make up and add more cornflour slurry – add a little at a time. If it is thicker than you would like, add a little water at a time.

- Taste the gravy and add Sea Salt Flakes a little at a time until the gravy is flavoursome. Don't be shy, salt is your friend with gravy.

- Serve with the sliced pork.
Notes
- The air fryer version of this recipe is tested in a 4.7 litre capacity Cosori 4.7L (CAF-L501). I cannot fit a pork leg this size in my Cosori Lite 3.8L (CAF-LI401S) which has a square(ish) shaped basket of 21cm x 21cm and 24cm on the diagonal. The depth of the basket is more of an important consideration in this case.
- Not all models advise preheating is required. Please follow the recommended instructions for your model. Mine has a specific preheat setting which is 4 minutes at 205c.
- For this recipe, I could just fit up to a 2kg pork shoulder in the basket. But only if I unfurl it and remove my crisper rack – which I am happy to do as it still cooks perfectly. A 1.5kg fit in my air fryer without issue.
- As all air fryer models are a little different, you may find that you can fit more or less in at a time.
- Required cooking times and temperatures can also vary between models and brands. If you know that your air fryer runs a little hotter than most recipes suggest, use a lower temperature. And vice versa. Equally if you find that food cooks more quickly in your machine than instructions usually state, reduce the cooking time (or check it earlier) and vice versa.
Cat says
Oh boy this was fantastic! The crackling was perfect and the meat was moist.
Brenda says
Cooked this for my family today and it went down an absolute treat! So tasty!
Dave says
I’ve never made crackling this good! Thanks for the clear instructions that made this such and easy recipe to follow.
Jen says
Followed your easy instructions and the pork leg was properly cooked through with perfect crispy crackling.