


This Air Fryer Topside Beef Roasting Joint recipe is a great way to quickly roast this popular cut of beef. I’ve included instructions to make a simple but delicious gravy from the beef drippings and as always, comprehensive step-by-step photos for how to prepare the beef and air fry it to perfection.

This post may contain affiliate links. Please refer to my Disclosures Page for more details.
Beef topside is often sold quite interchangeably with silverside of beef here in the UK. Both cuts are often simply labelled “beef roasting joint” and then you need a magnifying glass to see which you’re buying. Although to be fair, the cooking process is fairly identical. I do personally think that topside is the slightly more tender cut.
This recipe for topside of beef used a 1kg/2.2lb piece of beef. My recipe for silverside of beef uses a 1.8kg/4lb piece. So if you are cooking a larger piece of topside, I would actually suggest clicking through to my silverside recipe and following those cooking times.

Air Fryer Silverside Beef Roasting Joint Recipe
How to Serve
Topside of beef does have it’s natural home with a traditional roast dinner. I’ve served this cut with duck fat roast potatoes made in the air fryer, honey roasted parsnips which were also air fried, chantenay carrots and simply buttered spring greens. Of course there were yorkshire puddings too as well as the gravy made with the cooking juices.
Beef can also make a great alternative to turkey for a Christmas dinner. Or even better, for a super festive feast you can serve a selection of centerpiece meats – I love to serve beef and turkey.

Roast topside is a cut that I also often cook with the sole purpose of thinly slicing it and using as a deli meat. Allow the cooked joint to chill in full in the fridge, ideally overnight before slicing. You can do this with a steady hand and a very sharp knife. Or even better, if you have an electric meat slicer, this is an ideal use.
I’ll serve the thin slices warmed up in bread rolls with juicy fried onions and occasionally some melted cheese. Add slices to a bowl of instant ramen for an extra quick meal. Or add to a ploughman’s style platter to serve with chutney, sliced cheeses and lots of fresh salad.

Ingredients
Topside of Beef
As I’ve mentioned, topside is often sold under the guise of “beef roasting joint” in UK supermarkets. Some like M&S and Morrisons do label it as topside and of course a regular butcher will certainly have topsides. In the US, the cut is slightly different because cows are butchered a little differently but it essentially the “top round”.
Topside only generally has a very thin layer of fat on the top. Some will likely have been trimmed to have almost no fat at all. It is a cut which is on the leaner side so it is worth looking for a piece with as much marbling as possible. These little bits of fat spread throughout the meat will melt and keep the meat extra moist as it cooks.

Oil
Because of how lean topside of beef is, it is even more essential to make sure that you don’t skip properly oiling the meat before cooking. This will stop the very outer layer from just drying out and it’ll help promote the browning too. The oil also helps the seasoning to stick to the meat.
Which oil you choose to use is largely a personal preference. I have stuck with using a neutral flavoured vegetable oil to really focus on the flavour of the beef itself. If you use an oil with a more pronounced flavour, just make sure that it is complementary with the seasonings you are using and the meal you are planning to serve it with.
Seasoning
I’ve just used Maldon sea salt flakes to season the beef. When serving with a roast dinner, I largely like to keep the flavour simple and let the beef and all the various sides shine. But you can ramp things up by adding more traditional flavours like garlic and herbs or a mustard heavy rub.
All you need to make sure is that your seasoning contains a decent amount of salt.

Allergen Information
This recipe is free from egg, dairy, gluten and nuts.
Please note that this recipe may contain other allergens not referred to above and any variations suggested have not been tested unless otherwise stated. For more information regarding any dietary information provided on this website, please refer to my Nutritional Disclaimer.
How Long to Air Fry Topside of Beef
This 1kg/2.2lb air fries to medium-rare in 30 minutes. Add 5 minutes for medium, another 5 for medium-well and another 5 for well-done.
I recommend turning the beef halfway through the cooking time. This allows both sides to feel the benefit of the bulk of the direct heat. And that action of turning the meat allows the juices inside to redistribute and keep all of the meat moist.
Of course joints of beef do come in all sizes – this 1kg piece is on the smaller side. For each additional 500g/1lb you need to add around 10 extra minutes of cooking time.

How to Air Fry Topside Beef From Frozen
I do not recommend cooking joints of meat from frozen. Unlike with single portions of meat, there simply isn’t any way for the middle of the meat to thaw and cook before the outside becomes a dry shrivelled mess.
It is best to allow a frozen beef topside to fully thaw and then come to room temperature before air frying.

Leftovers – Storage & Reheating
I’ve already mentioned above that I love to put any leftovers onto my deli meat slicer the next day and make myself a big pile of cold cuts. If you don’t have an electric slicer like most normal people don’t and you are confident with a knife, you can slice it as thin as you can by hand. Slices will freeze and can be eaten or reheated as soon as they’re thawed.
There are plenty of other ways to use leftovers however. The beef will sit in the fridge in an air tight container for a couple of days. I love to make hot sandwiches with leftovers including the gravy – add some slow cooked onions for something akin to a French Dip Sandwich. You can also use slices of beef as a substitute for the corned beef in my corned beef & potato bake.
To reheat the beef, I like to do this by microwaving it with a very small amount of water. This effectively steams it and prevents it from drying out or overcooking. To replicate this in an air fryer, you can loosely wrap the meat in foil along with a dash of water and then cook until the meat is piping hot – probably 5 minutes or so depending on how much you’re reheating.

Common Air Fryer Questions – A Brief Guide to Air Frying
- What exactly is an air fryer?
- What are the benefits of using an air fryer?
- Are all air fryers the same?
- Is an air fryer always better to use than an oven?
- Do air fryers need to be pre-heated?
- What is the best temperature to air fry at?
- What setting is best to use? Air fry, bake, dehydrate, etc…
- Can food be cooked from frozen in an air fryer?
- Can I reheat food in an air fryer?
- Are air fryer liners a good idea?
The Air Fried Feast Community

Come on over to Facebook and join my community discussing all things air fryer. Get involved in sharing your experiences and trials, help out others and find out what wonderful things everyone is cooking in their air fryers!
What Exactly is an Air Fryer?
Very simply, an air fryer is a small convection (fan) oven. The benefit is that the hot air is circulated all around the food being cooked which speeds up the cooking time and cooks the food more evenly.
What are the Benefits of Using an Air Fryer?
Size, time and energy usage. Air fryers are ideal for cooking smaller quantities. Heating up a space that the food just fits into requires less energy and means that the heat source is much closer to the food. Combining these two things can speed up the cooking time.

Are all air fryers the same?
Nope! The term air fryer is now used very broadly. I consider there to be 4 main types:
Basket Air Fryers
These are what I would consider to be the most common, especially in the UK. A boxy type unit has a pull out drawer/basket. Food isn’t usually visible whilst cooking.
Some larger models have two drawers so different items can be cooked at different temperatures or for different times.
This is the type that you’ll see in the images in this recipe. I mostly use a Cosori Lite 3.8L (CAF-LI401S) with a 3.8 litre capacity. The square(ish) shaped basket is 21cm x 21cm and 24cm on the diagonal. It isn’t an overly expensive or fancy model.
I’ve also recommended to several friends and family the model with a slightly larger basket. This is the Cosori 4.7L (CAF-L501) with a 4.7 litre basket. The unit is no larger than the 3.8 litre model on the outside but does have a larger internal basket capacity. I’ve since bought this version to use for some recipes where my smaller model was just too small. I’ll always note this in the recipe.
Rotary Air Fryers
Round air fryers with a paddle in the centre that rotates to move the food. This is the type I used for years – the most common is a Tefal Actifry.
Rotary types are not usually good for recipes where the food is breaded, glazed, likely to break up or in a tray/container. They do however make the best chips and roasted veg.
My 2 in 1 version like the one I’ve linked also has a rotating tray for things that could be broken up by a paddle, but the height clearance with the lid isn’t deep enough to use it to cook some items like sausage rolls. I’ve now actually retired by Actifry in favour of having my two basket type fryers.
Mini Oven Air Fryers
These usually have a glass door, shelves and overall are really quite large. You can cook quite a decent quantity of food in them so are best if regularly cooking for multiple people. They often come with extra features like a rotisserie spit or kebab skewers.
Multicookers with Air Fryer Functions
Some like Ninja 11 in 1 and some of the earlier versions with a few less functions, have an air fryer option. They mostly operate the same as a basket fryer but the basket drops in the top rather than sliding in like a drawer.
Some electric pressure cookers like Instant Pots can also air fry when used with a specific lid.
Is an air fryer always better to use than an oven?
As much as I do love air frying, the honest answer to this is no. And the more detailed answer is that it will always depend on what you’re cooking, how much of it you’re cooking and what type and size of air fryer you have.
Once you need to cook in more than 2 batches, it often makes more sense to use an oven. If you already have the oven on to cook other items, it may make more sense to throw one more item in rather than using an additional appliance.
I don’t think either method is often necessarily better than the other. The important point to note is that there is absolutely no difference in the finished product.
Do Air Fryers Need to Be Pre-Heated?
The answer to this is rather annoying – it depends. It depends entirely on your model and type of air fryer. The best advice I can offer is to check your manual and follow their guidance. My Cosori models have a preheat function. I press a button and it heats at 205c/400f for 4 minutes.
It’s also worth noting that regardless of whether you are supposed to pre-heat or not, if you are cooking in batches, it is quite likely that anything after the first batch will cook a little quicker because of the retained heat. It is best to check on them before the cooking time is completed.

What is the best temperature to Air Fry at?
It will always depend on what you are cooking and from what state. All of my air fryer recipes don’t use temperatures above 200c/390f because many of the most common fryers in the UK don’t go above this. Mine goes to 230c/450f and I use this temperature a lot but it is no help for me to share recipes which many people can’t use.
What setting is best to use? Air fry, bake, dehydrate, etc…
Not all air fryers have different settings like this. When they do it usually relates to the fan speed. The default setting to use will always be “air fry” so unless something else is specifically stated in the recipe, always use the air fry option.
There are other air fryers that have an additional heating element which cooks from underneath rather than just the top. Just as with the other settings, unless you are using a recipe which states to use a second heating element, stick with just using the top down air fry option.
Of course if and when you become more confident with air frying, using recipes and the settings of your air fryer, you can start adapting them to suit.

Can Food Be Cooked From Frozen In An Air Fryer?
Absolutely! To cook from frozen you usually will need to reduce the cooking temperature and increase the time to make sure your food is cooked right through to the middle.
It is best to check my individual recipes for cooking from frozen advice as some items are a little different. And there are occasionally exceptions to the rule.
Can I Reheat Food In An Air Fryer?
Yes. As a general rule I reheat food for roughly 1/3 of the original cooking time at the same temperature. Or at 10 degrees lower for half the time for larger items.
Are Air Fryer Liners a Good Idea?
Unless otherwise stated, I do not use liners when air frying. Basket and rotary type air fryers are designed to be used without liners. Mini oven types will generally require some kind of tray like with a regular large oven although most come with crisper racks to use.
There are many air fryer liners available including quite thick silicone ones. These will affect the cooking times and possibly temperatures of your cooking/baking. I also don’t like how cooking juices are prevented from dripping through the basket rack. This can stop food from crisping all the way around.
When I do want to collect the juices, I mostly use some foil, or occasionally a foil tray which can be washed and reused.
If you do prefer to use them, once you have got a feel for how they affect your cooking and baking, you may need to make adjustments to the recipe accordingly.

More Air Fryer Recipes
All my recipes with instructions for how to cook or bake them in the air fryer can be found in my Air Fryer Recipe Index.


Don’t forget to let me know in the comments if you try making this recipe – I want to know what you think and if you made any substitutions, how did it turn out?
Still Have Questions?
Simple! Just contact me and I will do my best to help as quickly as I am able. Head over to my Contact Me page, any of my social media channels or post a comment at the bottom of this page and I’ll see what I can do.
Pin Air Fryer Topside Beef Roasting Joint For Later
Hit one of the share buttons to save this page to your Pinterest boards so you can come back and find it at anytime!

Keep Up to Date
Make sure you SUBSCRIBE to my newsletter and avoid missing out on any of my newest and bonus content. Don’t worry, I promise not to spam you or bombard you too often. Plus you’ll receive a copy of my FREE 7 Day International Meal Plan!
Also please don’t forget to follow me over on my social media channels over at Facebook, Instagram and Pinterest. I love to interact with my followers and I’d love you to share my content with your friends too.
The Recipe
Air Fryer Topside Beef Roasting Joint Recipe

Equipment
Ingredients
- 1 kg Beef Topside
- 1 tbsp Vegetable Oil
- 2 tsp Sea Salt Flakes
For the gravy
- 400 ml Water
- 3 tbsp Cornflour (Cornstarch)
- 3 tbsp Water
- Sea Salt Flakes
Instructions
Things to Consider
- Make sure that the joint has plenty of clearance in the air fryer with the drawer shut/lid on/door closed. Joints of meat have a tendency of expanding as they start to cook so bear this in mind.If you think there might be an issue, remove any string from the joint and unroll it as much as possible. You can also consider removing the crisper rack.
Air Fry The Beef
- If your air fryer requires pre-heating, start this setting now.
- Thoroughly dry a 1 kg Beef Topside Joint and remove any string/netting – it isn't needed.


- Drizzle with roughly 1 tbsp Vegetable Oil and rub all over the joint including the underneath and ends.
- Season well with roughly 2 tsp Sea Salt Flakes. Again, don't miss all the sides and underneath.

- Place the beef into the air fryer basket. If it is a preheated basket, use 2 forks to lower the meat in so you don't touch the hot metal with your hands.

- Air fry for 15 minutes at 180℃/350℉.
- Turn the beef in the basket.

- Air fry for a further 15 minutes at 170℃/350℉. This will cook to a medium rare. Add 5 minutes for medium and a further 5 for medium well. If you prefer beef any more cooked than that, this isn't the right cut and cooking method of beef – it will just be tough. Remember that the beef will continue cooking slightly as it rests.
- Allow the beef to rest for at least 15 minutes. You can either leave it in the air fryer turned off or wrap it in foil and cover with a towel. Use this time to make the gravy.

- Pour any juices and fat from the basket into a small saucepan. Don't forget to add any juices from the resting period to the reserved juices/fat or gravy if it's already made.

- Carve into thick or thin slices as preferred and serve.

To Make The Beef Gravy
- Start heating the beef juices and fat over a high heat.

- Add 400ml Water to the pan. Freshly boiled from the kettle will speed up the process.

- Mix 3 tbsp Cornflour with roughly 3 tbsp Water until all the cornflour has dissolved.

- Once the juices and water have come to the boil, add the cornflour slurry with one hand while whisking with the other.
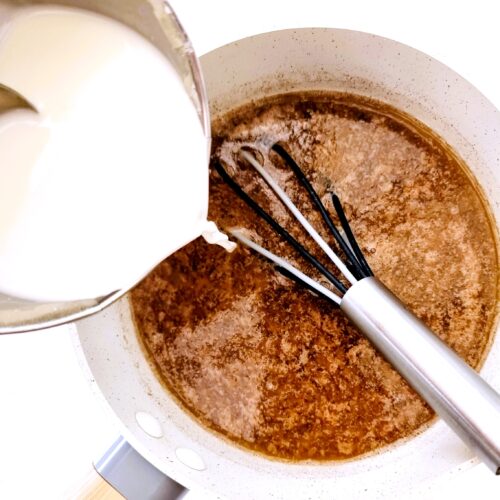
- Continue to boil until the gravy is thickened. If after a few minutes, it is not thick enough for your liking, make up and add more cornflour slurry – add a little at a time. If it is thicker than you would like, add a little water at a time.


- Taste the gravy and add Sea Salt Flakes a little at a time until the gravy is flavoursome. Don't be shy, salt is your friend with gravy.
- Pour into a jug and serve with the sliced beef.

Notes
- The air fryer version of this recipe is tested in a Cosori Lite 3.8L (CAF-LI401S) which has a square(ish) shaped basket of 21cm x 21cm and 24cm on the diagonal. The depth of the basket is more of an important consideration in this case.
- Not all models advise preheating is required. Please follow the recommended instructions for your model. Mine has a specific preheat setting which is 4 minutes at 205c.
- For this recipe, I could easily fit in up to a 1kg beef topside in the basket.
- As all air fryer models are a little different, you may find that you can fit more or less in at a time.
- Required cooking times and temperatures can also vary between models and brands. If you know that your air fryer runs a little hotter than most recipes suggest, use a lower temperature. And vice versa. Equally if you find that food cooks more quickly in your machine than instructions usually state, reduce the cooking time (or check it earlier) and vice versa.
Jamie says
Cooked to absolute perfection – my family loved it.
Dave says
I wasn’t sure how this would do in the air fryer but thought I’d try it. Well, I won’t ever be cooking beef any other way, it was so perfect.
Lesley says
Followed your easy recipe and I had perfectly cooked beef, nice and pink. Also, the leftovers made great sandwiches!